How I Made This Blog
First of all, why would I want my own website and blog? There are so many publishing platforms, many of which really help with distribution, why create my own?
These are logical questions. I have been using Medium until now to publish my thoughts, and it's really a good tool with some great features for publishing general content and pushing it out to followers. Here are a few reasons I chose to move away:
- Medium oftentimes puts content behind a paywall. I don't need my content behind a paywall.
- Medium has fairly limited tools for formatting content. As we'll discuss below, this content was written in Markdown, which is a good balance of features and convenience - paritcularly for technical content.
- It's realtively cheap to host my own site in AWS and I can do anything I want with it.
So now that we have that out of the way, let's talk about what I did to create this site over the weekend. Maybe you will want to do the same.
Goals #
I established a few goals to drive my decisions:
- Cheap: Let's make this inexpensive. It's not a money-maker for me.
- Simple: This is a one-man operation. I don't need anything fancy, and I need to be able to publish without jumping through a bunch of hoops.
With those goals in mind, I made a few key design decisions:
- Use a static site generator framework so I don't need any backend server infrastructure, just file hosting.
- Use Markdown for my content formatting. I know it. It's simple. It's robust enough.
- Use Git as my tool to initiate publishing.
- Automate everything beyond
git push...so that I don't have to think about it. - Use Gitlab for managing source and CI since it's free for a private repo.
Static Site #
I decided I wanted to create a simple static site with no server-side rendering or content management. What you're reading are static files generated by a framework and hosted in a S3 bucket.
There are a ton of tools to use for this. I've used Pelican for a past project. This time I went with Eleventy. Here's how I ran a quick proof of concept:
mkdir blogpoc
cd blogpoc
nvm use 20
echo '# Heading' > index.md
npx @11ty/eleventy --serve
Open up a browser to http://localhost:8080 and boom you have a working website. When you run npx @11ty/eleventy it will generate all the static html + js + css and dump them into _site. Cool. It works.
Next I grabbed a template that I could customize. I chose eleventy-base-blog v8. It's well-documented. There are other choices that are probably just as good or better. Take your pick. This was mine, so I cloned the repo per the instructions and re-init'd it to make it my own:
rm -rf ./.gitThen I made the project Yarn-based:
npm install --global yarn
yarn init
yarn install
yarn start
# check localhost:8080
Great. Now I have a working website with a template I can customize and to which I can add content. Let's push this to Gitlab. I created a new blank, private project in Gitlab. Then...
git init --initial-branch=main
git remote add origin git@gitlab.com:{your username}/{your project name}.git
git add .
git commit -m "first commit"
git push -u origin main
CI Pt. 1 #
Next I made sure we could build the static site in Gitlab's CI. I created .gitlab-ci.yml in the root of the project with this content:
stages:
  - build

build:
  image: node:lts
  stage: build
  script:
    - yarn install
    - npx @11ty/eleventy
    - ls -la .

  artifacts:
    untracked: true
    paths:
      - _site
Then I pushed the new code to Gitlab and checked on the build pipeline. I was checcking to make sure that it ran successfully first of all. Then I looked in the out put from the run to see the output of the ls -la . command. Specifically I wanted to make sure that the _site directory existed. It did. Good. Now it's time to give the site a place to live...
Infrastructure #
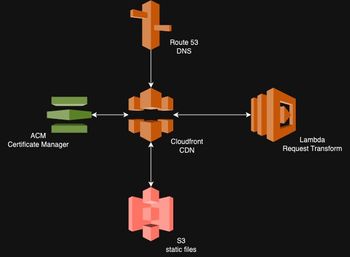
I'm familiar with AWS, so I went with the idea of hosting the site in an S3 bucket and using Cloudfront for CDN and adding a certificate. Before we go on, here's a quick picture that shows how the site will be hosted:
Before I did any of the infrastructure set-up detailed below, I registered my domain name by hand in Route 53. It's fast and easy and cheap. That domain name gets used in a variable in the Terraform.
Now, I'm about to give you the whole shootin' match when it comes to infrastructure. Rest assured that it was an iterative process to get to the state that you'll see here. Nonetheless, if you're using this as a guide, hopefully this just gives you a leg up to skip a few iterations.
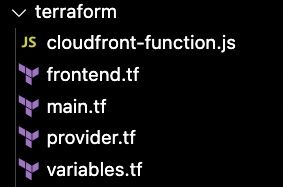
I set evertyhing up with Terraform (or OpenTofu in the context of Gitlab CI). I know. It seems like a sledgehammer for a one-off personal website. And it may be. But I also had a bunch laying around from other projects, and I find it really tedious trying to remember all the boxes to check to make things work in the AWS console. So I went with Terraform. I also happen to use Terraform to manage the actual deployment of the site, as you'll see. So that you can have a clear picture of where we'll end up with this, I created a terraform directory in the root of my project. This is what it looks like:
provider.tf + main.tf #
The easy files to get out of the way are the foundations for the whole shebang. Here's what provider.tf looks like:
terraform {
  required_providers {
    aws = {
      source  = "hashicorp/aws"
      version = "~> 5.27.0"
    }
  }

  backend "http" {
  }
}

provider "aws" {
  region = "us-east-1"
}

provider "aws" {
  alias  = "acm_provider"
  region = "us-east-1"
}
Note the backend "http" part. That indicates that I use Gitlab's Terraform state management. It's super handy.
Next, here's what main.tf looks like:
data "aws_iam_policy_document" "assume_role" {
  statement {
    effect = "Allow"

    principals {
      type        = "Service"
      identifiers = ["lambda.amazonaws.com", "s3.amazonaws.com"]
    }

    actions = ["sts:AssumeRole"]
  }
}

resource "aws_iam_role" "iam_for_johnthefactotum" {
  name               = "iam_for_johnthefactotum"
  assume_role_policy = data.aws_iam_policy_document.assume_role.json
}
Here we're establishing the IAM roles with permissions for various services to talk with one another.
Now, onto the meat of the infrastructure: frontend.tf. I'll put it here in pieces...
frontend.tf #
The first thing I do is establish some handy local variables that will be used below in the file:
locals {
  dist_dir    = "${path.module}/../_site"
  module_name = basename(abspath(path.module))
  prefix      = var.prefix

  content_types = {
    ".html" : "text/html",
    ".css" : "text/css",
    ".js" : "application/javascript",
    ".json" : "application/json",
    ".xml" : "application/xml",
    ".jpg" : "image/jpeg",
    ".jpeg" : "image/jpeg",
    ".png" : "image/png",
    ".gif" : "image/gif",
    ".svg" : "image/svg+xml",
    ".webp" : "image/webp",
    ".ico" : "image/x-icon",
    ".woff" : "font/woff",
    ".woff2" : "font/woff2",
    ".ttf" : "font/ttf",
    ".eot" : "application/vnd.ms-fontobject",
    ".otf" : "font/otf"
  }
}
The dist_dir just says that the files we'll be uploading to S3 will be in the _site directory. The other important one is the content_types map. This is used to make sure that S3 has the correct content type for the files when serving them to a user's browser.
Next I create the S3 bucket and configure it:
# S3 src website bucket
resource "aws_s3_bucket" "static_website" {
  bucket = var.bucket_name

  tags = var.common_tags
}

resource "aws_s3_bucket_website_configuration" "website_bucket" {
  bucket = aws_s3_bucket.static_website.id

  index_document {
    suffix = "index.html"
  }

  error_document {
    key = "404.html"
  }

}

# S3 bucket ACL access

resource "aws_s3_bucket_ownership_controls" "website_bucket" {
  bucket = aws_s3_bucket.static_website.id
  rule {
    object_ownership = "BucketOwnerPreferred"
  }
}

resource "aws_s3_bucket_public_access_block" "website_bucket" {
  bucket = aws_s3_bucket.static_website.id

  block_public_acls       = true
  block_public_policy     = true
  ignore_public_acls      = true
  restrict_public_buckets = true

}

resource "aws_s3_bucket_acl" "website_bucket" {
  depends_on = [
    aws_s3_bucket_ownership_controls.website_bucket,
    aws_s3_bucket_public_access_block.website_bucket,
  ]

  bucket = aws_s3_bucket.static_website.id
  acl    = "private"
}
All this does is set up the bucket for static site hosting and make sure it's not wide open to the public. We only want to serve requests that come from Cloudfront.
Next I set up the certificate to make sure that my website is served over HTTPS:
# SSL Certificate
resource "aws_acm_certificate" "ssl_certificate" {
  provider                  = aws.acm_provider
  domain_name               = var.domain_name
  subject_alternative_names = ["*.${var.domain_name}"]
  #validation_method         = "EMAIL"
  validation_method = "DNS"

  tags = var.common_tags

  lifecycle {
    create_before_destroy = true
  }
}

resource "aws_acm_certificate_validation" "cert_validation" {
  provider                = aws.acm_provider
  certificate_arn         = aws_acm_certificate.ssl_certificate.arn
  validation_record_fqdns = [for record in aws_route53_record.cert_validation : record.fqdn]
}

resource "aws_route53_record" "cert_validation" {
  for_each = {
    for dvo in aws_acm_certificate.ssl_certificate.domain_validation_options : dvo.domain_name => {
      name   = dvo.resource_record_name
      record = dvo.resource_record_value
      type   = dvo.resource_record_type
    }
  }
  allow_overwrite = true
  name            = each.value.name
  records         = [each.value.record]
  ttl             = 60
  type            = each.value.type
  zone_id         = aws_route53_zone.main.zone_id
}
Here I created a certificate for *.{domain}.com, and created the CNAME records to validate the certificate. If you're not familar, this is just a way for the certificate issuer to validate that you actually own the domain in question.
Now that I have the certificate, I set up the Cloudfront distribution:
resource "aws_cloudfront_origin_access_control" "current" {
  name                              = "OAC ${aws_s3_bucket.static_website.bucket}"
  origin_access_control_origin_type = "s3"
  signing_behavior                  = "always"
  signing_protocol                  = "sigv4"
}

resource "aws_cloudfront_distribution" "s3_distribution" {
  depends_on = [aws_s3_bucket.static_website]
  origin {
    domain_name              = aws_s3_bucket.static_website.bucket_regional_domain_name
    origin_id                = "${var.bucket_name}-origin"
    origin_path              = "/${var.git_sha}"
    origin_access_control_id = aws_cloudfront_origin_access_control.current.id
  }
  comment         = "${var.domain_name} distribution"
  enabled         = true
  is_ipv6_enabled = true
  http_version    = "http2and3"
  price_class     = "PriceClass_100" // Use only North America and Europe
  // wait_for_deployment = true
  aliases = [
    var.domain_name,
    "www.${var.domain_name}"
  ]
  default_root_object = "index.html"
  # custom_error_response {
  #   error_code           = 403
  #   response_code        = 200
  #   response_page_path   = "/index.html"
  # }

  default_cache_behavior {
    cache_policy_id        = "4135ea2d-6df8-44a3-9df3-4b5a84be39ad"
    viewer_protocol_policy = "redirect-to-https"
    allowed_methods        = ["DELETE", "GET", "HEAD", "OPTIONS", "PATCH", "POST", "PUT"]
    cached_methods         = ["GET", "HEAD"]
    compress               = true
    target_origin_id       = "${var.bucket_name}-origin"

    function_association {
      event_type   = "viewer-request"
      function_arn = aws_cloudfront_function.www_redirect.arn
    }

  }
  restrictions {
    geo_restriction {
      restriction_type = "none"
      locations        = []
    }
  }
  viewer_certificate {
    acm_certificate_arn      = aws_acm_certificate_validation.cert_validation.certificate_arn
    ssl_support_method       = "sni-only"
    minimum_protocol_version = "TLSv1.2_2021"
  }
  tags = var.common_tags
}
Here's what I'm doing:
- Set up access control so that Cloudfront will be able to get content from S3.
- Create the distribution.
- Point the origin to a subdirectory in S3 that uses the current Git SHA as its name (more on that in a minute).
- Make sure the distribution can accept requests for the root domain and the www variant.
- Attach a Cloudfront function (more on that in a minute).
- Tell it to use the certificate we created above.
Then I create the Cloudfront function referenced above...I'll show the details of the function in a moment:
resource "aws_cloudfront_function" "www_redirect" {
  name    = "${local.prefix}-www-redirect"
  runtime = "cloudfront-js-1.0"
  code    = file("./cloudfront-function.js")
  publish = true
}
Now I make sure that we have A records in DNS that will point folks to the Cloudfront distribution we created:
resource "aws_route53_zone" "main" {
  name = var.domain_name
  tags = var.common_tags
}

resource "aws_route53_record" "root_a" {
  zone_id = aws_route53_zone.main.zone_id
  name    = var.domain_name
  type    = "A"

  alias {
    name                   = aws_cloudfront_distribution.s3_distribution.domain_name
    zone_id                = aws_cloudfront_distribution.s3_distribution.hosted_zone_id
    evaluate_target_health = false
  }
}

resource "aws_route53_record" "www_a" {
  zone_id = aws_route53_zone.main.zone_id
  name    = "www.${var.domain_name}"
  type    = "A"

  alias {
    name                   = aws_cloudfront_distribution.s3_distribution.domain_name
    zone_id                = aws_cloudfront_distribution.s3_distribution.hosted_zone_id
    evaluate_target_health = false
  }
}
I still have some details to take care of to make sure that Cloudfront is allowed to get files from S3. It turns out I'm not great at this part when doing it by hand. It's always a lot of futzing and frustration:
resource "aws_s3_bucket_policy" "allow_cloudfront" {
  bucket = aws_s3_bucket.static_website.id
  policy = data.aws_iam_policy_document.cloudfront.json
}

data "aws_iam_policy_document" "cloudfront" {
  statement {
    sid     = "AllowCloudFrontServicePrincipalReadOnly"
    effect  = "Allow"
    actions = ["s3:GetObject"]
    resources = [
      aws_s3_bucket.static_website.arn,
      "${aws_s3_bucket.static_website.arn}/*"
    ]

    principals {
      type        = "Service"
      identifiers = ["cloudfront.amazonaws.com"]
    }

    condition {
      test     = "StringEquals"
      variable = "AWS:SourceArn"
      values = [
        aws_cloudfront_distribution.s3_distribution.arn
      ]
    }
  }
}
Lastly, as I referenced above, I use Terraform to manage copying files to S3 for deployment. The block below uses AWS CLI to upload files and make sure that the content type is set correctly. More specifically, it uploads the files to a directory* with the current Git SHA as the name. This allows me to keep past versions of my site in S3 with the need to occasionally delete old versions. When I show how all of this runs in CI, it will become clear why I do it this way.
resource "null_resource" "upload_frontend" {
  for_each    = fileset(local.dist_dir, "**/*.*")
  provisioner "local-exec" {
    command = "aws s3api put-object --bucket ${aws_s3_bucket.static_website.id} --key \"${var.git_sha}/${each.value}\" --body \"${local.dist_dir}/${each.value}\" $CONTENT_TYPE"
    environment = {
      CONTENT_TYPE = lookup(local.content_types, regex("\\.[^.]+$", each.value), "") != "" ? "--content-type ${lookup(local.content_types, regex("\\.[^.]+$", each.value), "")}" : ""
    }
  }

  triggers = {
    always_run = "${timestamp()}"
  }
}
* S3 doesn't actually have file hierarchy like we're used to with "directories". All it does under the hood is pre-pend the directory name with some slashes as a key for the file.
cloudfront-function.js #
Cloudfront gives us the ability to add functions that run whenever it fields a request. I needed to accomplish two things with every request:
- www redirection: If somebody browsed to my site using the
wwwsubdomain, I want to redirect them to the naked domain. - Index resolution: Eleventy generates links to pages by making the
hrefin a link something likehttps://domain.com/foobar/baz/and then generating a directory by that name withindex.htmlin the directory. It turns out that nothing in our hosting infrastructure makes that an easy/automatic task, so we need some logic to determine when there's a request that needs the string "index.html" appended.
With those things in mind, this is the Javascript Cloudfront function that I cobbled together from other people's solutions:
function handler(event) {
  var request = event.request;
  var hostHeader = request.headers.host.value;

  // Regular expression to extract the top-level domain and root domain
  var domainRegex = /(?:.*\.)?([a-z0-9\-]+\.[a-z]+)$/i;
  var match = hostHeader.match(domainRegex);

  // If the regex does not match, or the host does not start with 'www.', return the original request
  if (!match || !hostHeader.startsWith('www.')) {
      if ((request.uri !== "/") /* Not the root object, which redirects properly */
          && (request.uri.endsWith("/") /* Folder with slash */
              || (request.uri.lastIndexOf(".") < request.uri.lastIndexOf("/")) /* Most likely a folder, it has no extension (heuristic) */
              )) {
          if (request.uri.endsWith("/"))
              request.uri = request.uri.concat("index.html");
          else
              request.uri = request.uri.concat("/index.html");
      }
      return request;
  }

  // Extract the root domain
  var rootDomain = match[1];

  // Construct and return the redirect response
  return {
      statusCode: 301,
      statusDescription: 'Moved Permanently',
      headers: {
          "location": { "value": "https://" + rootDomain + request.uri },
          "cache-control": { "value": "max-age=3600" }
      }
  };
}
variables.tf #
And finally, I needed to declare all the variables used in everything above:
variable "aws_region" {
  type        = string
  description = "AWS Region"
  default     = "us-east-1"
}

variable "prefix" {
  type        = string
  description = "The prefix to be added to resource names"
  default     = "johnthefactotum"
}
variable "domain_name" {
  type        = string
  description = "The domain name for the website."
  default     = "johnthefactotum.com"
}
variable "bucket_name" {
  type        = string
  description = "The name of the bucket without the www. prefix. Normally domain_name."
  default     = "johnthefactotum.com"
}
variable "common_tags" {
  type        = map(string)
  description = "Common tags you want applied to all components."
  default     = {}
}

variable "git_sha" {
  type        = string
  description = "The git commit hash that helps us version deployed software."
  nullable    = false
}
Just a couple of quick notes:
- Obviously all of these used my domain. Substitute yours.
- The
git_shavar gets passed in by CI, which we'll see in a moment.
CI Pt. 2 #
Now that I have all of my Terraform code, it's time to give it a shot. I use Gitlab to manage all of it. At this point, the build process is short enough that I don't bother trying to set things up to run Terraform locally and manage state remotely with Gitlab. It's totally possible, and I've done it before. But this is small potatoes, and I have the weekend to run the cycles in CI.
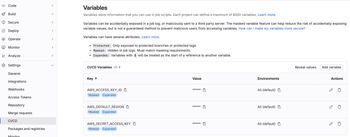
Before I go any further, I need to make sure that Gitlab's CI can interact with AWS for deployments. To do that, I created access tokens in the AWS console and added them as CI/CD variables in Gitlab:
Then I updated .gitlab-ci.yml to look like this:
include:
  - component: gitlab.com/components/opentofu/job-templates@0.17.0
    inputs:
      version: 0.17.0
      opentofu_version: 1.6.1
      root_dir: terraform/


stages:
  - build
  - plan
  - deploy

workflow:
  rules:
    - if: $CI_PIPELINE_SOURCE == "merge_request_event"
    - if: $CI_COMMIT_BRANCH == "main" && $CI_PIPELINE_SOURCE == "push"

.tf_vars: &tf_vars
  - export TF_VAR_git_sha=$CI_COMMIT_SHA

build:
  image: node:lts
  stage: build
  script:
    - yarn install
    - npx @11ty/eleventy
    - ls -la .

  artifacts:
    untracked: true
    paths:
      - _site

tf:plan:
  stage: plan
  extends: [.opentofu:plan]
  before_script:
    - *tf_vars
    - ls -la .

tf:apply:
  stage: deploy
  extends: [.opentofu:apply]
  dependencies:
    - build
    - tf:plan
  artifacts:
    paths:
      - tf_outputs.txt
  before_script:
    - apk add py3-pip aws-cli
    - alias pip=pip3
    - *tf_vars
    - ls -la .
  after_script:
    - tofu output > tf_outputs.txt
  rules:
  - if: $CI_COMMIT_BRANCH == "main"
The build stage should look familiar. The plan and deploy stages are just running the OpenTofu (just open-source Terraform) commands to plan and apply the Terraform code I made. The only thing I really augmented was that I instal AWS CLI before running the apply command so that the Terraform code can upload files to S3 like I addressed above. The other difference you'll see here is that I added some rules so that I can have a normal workflow for committing code/content on a branch before merging into main to actually publish.
Then push into the main branch. The pipeline will run, but it will get stuck in the certificate validation step. I cancel it at this point to go help it along with doing a little one-time work in the AWS console.
The Terraform will have done a wonderful job creating all the resources up to this point, including the CNAMEs needed to validate domain ownership. However, there are always some name server mismatches that happen at this point that I've always had to correct by hand to make things work. Here's what I do:
- Go into the Hosted Zone for your domain, and click on the dropdown arrow next to "Hosted Zone Details" to reveal the name servers for the hosted zone.
- In a separate tab, open up the "Registered Domains" from the left navigation, and open up the domain for the website.
- In the "Details" of the registered domain, click on "Actions" and then "Edit Name Servers".
- Copy over the name servers from the Hosted Zone.
- Make sure that the Name Servers for the CNAME record created to validate the certificate match the Hosted Zone's as well.
After a little while (sometimes a day, but usually less), the certificate will show as "validated" in the AWS ACM console. Now I can re-run my pipeline to get things deployed:
git commit --allow-empty -m "force deploy"
git push
The only problem that I've run into at this point is that the Terraform state was locked. In this case, I'll navigate to the saved Terraform state in Gitlab, click on the three dots on the right, and release it. Repeat the empty commit, and it goes on its way.
Party On #
At this point, you, dear reader, have all the pieces of the puzzle to go make your own website. I've just been spending time customizing styles and creating content since all of the set-up detailed above. After I get done writing this, I'll commit the new content to a branch and push to Gitlab. Then I'll open up a merge request (pull request if you're in Github) and set it to auto-merge. That's it. The rest is magic (that you now know how to do yourself).
Note: Any content older than this post in this blog is copied over from Medium.
- Previous: Investment Advice
- Next: Migrating Terraform State in Gitlab