Migrating Terraform State in Gitlab
This will be a quick one. The scenario would go something like this:
You have a user-facing website that uses Terraform to maintain infrastructure. You're using Gitlab CI to run all your infrastructure automation and host your Terraform state. You've decided to re-design your website and it was just easier to start a new repository to do so...a clean slate. But, in the end, you want to continue using your current hosting infrastructure, just with new files to serve.
There are a couple of ways you could handle this:
- Once you have youre new website ready to go, you do a big copy-paste into the old repository, replacing a bunch of files, and creating a pretty massive merge request.
- You copy your Terraform code and migrate hosted Terraform state to the new repository.
We'll look at the latter. For the sake of this exercise, we'll say that your Gitlab username is username, the old repo is called old_site, and the new repo is called new_site.
Step 1: Copy Pasta #
The first this we're going to do is get the new repo set up with the files we need from the old repo. Copy over .gitlab-ci.yml and the directory containing your Terraform code. Start a new feature branch in new_site. If you set up your site like the previous post, it would look something like this:
cd directory/that/contains/both/projects/in/subdirectories
cp old_site/.gitlab-ci.yml new_site
cp -r old_site/terraform new_site/terraform
The final copy-pasta you need to do is to set up your AWS credentials in CI like you did in your old repo.
Don't push your code to Gitlab yet. We'll get there.
Step 2: Set Up Gitlab Access Tokens #
Login to Gitlab, and navigate to your profile. Click on Access Tokens in the left navigation. Then click Add New Token.

Give the new token a name and check "api" for the access level. Give it an expiration date and click the blue "Create persnoal access token" button at the bottom of the page.
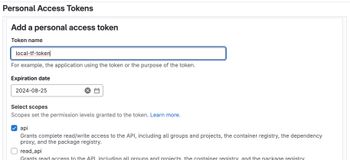
In the next screen, click the button to copy the access token to your clipboard. Paste it somewhere you can grab it for a later step.
Step 3: Install OpenTofu or Terraform #
Gitlab uses OpenTofu, so I do the same locally for consistency. You can use Terraform as well, I believe, for the following operations. I'm going to show everything in OpenTofu, but the flow and syntax should be the same regardless.
If you're running something other than MacOS, see OpenTofu's installation page for instructions. Otherwise, just...
brew update
brew install opentofu
Step 4: Pull Old State #
When moving state to the new project, you basically just pull down a JSON state file and then turn around and push it to a different place. You can do this in your terminal. I'm just going to give you the point-and-click way because it's easy.
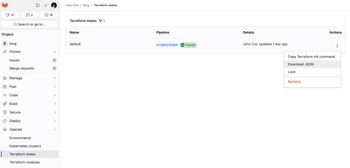
Go to Gitlab and navigate to your saved Terraform state in old_site. The URL will be something like https://gitlab.com/username/old_site/-/terraform. You can also see the navigation in the image below. Click on the actions icon to the right of your state and click "Download JSON". Save it somewhere convenient like your home directory.
Step 5: Initialize OpenTofu/Terrform #
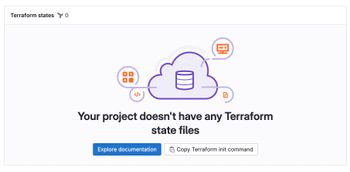
While you're in Gitlab, navigate over to the Terraform state page in the new_site repo. We're going to grab the Terraform init command from there. When you get there, click on the "Copy Terraform init command" button.
The easy way to do this is to paste that command into an editor to fill in your access token from the previous step. Here's what that command looks like (with some <PLACE HOLDERS>):
export GITLAB_ACCESS_TOKEN=<YOUR-ACCESS-TOKEN>
export TF_STATE_NAME=default
terraform init \
    -backend-config="address=https://gitlab.com/api/v4/projects/<YOUR PROJECT NUMBER>/terraform/state/$TF_STATE_NAME" \
    -backend-config="lock_address=https://gitlab.com/api/v4/projects/<YOUR PROJECT NUMBER>/terraform/state/$TF_STATE_NAME/lock" \
    -backend-config="unlock_address=https://gitlab.com/api/v4/projects/<YOUR PROJECT NUMBER>/terraform/state/$TF_STATE_NAME/lock" \
    -backend-config="username=<YOUR USERNAME>" \
    -backend-config="password=$GITLAB_ACCESS_TOKEN" \
    -backend-config="lock_method=POST" \
    -backend-config="unlock_method=DELETE" \
    -backend-config="retry_wait_min=5"
Hop into the directory with your Terraform code, and run the init command. I'll run through a parameterized version below. I'll also be using the tofu command instead of terraform. Substitue as necessary.
cd new_site/terraform
export GITLAB_ACCESS_TOKEN=<YOUR-ACCESS-TOKEN>
export TF_STATE_NAME=default
export PROJECT=<YOUR PROJECT NUMBER>
tofu init \
    -backend-config="address=https://gitlab.com/api/v4/projects/$PROJECT/terraform/state/$TF_STATE_NAME" \
    -backend-config="lock_address=https://gitlab.com/api/v4/projects/$PROJECT/terraform/state/$TF_STATE_NAME/lock" \
    -backend-config="unlock_address=https://gitlab.com/api/v4/projects/$PROJECT/terraform/state/$TF_STATE_NAME/lock" \
    -backend-config="username=<YOUR USERNAME>" \
    -backend-config="password=$GITLAB_ACCESS_TOKEN" \
    -backend-config="lock_method=POST" \
    -backend-config="unlock_method=DELETE" \
    -backend-config="retry_wait_min=5"
That will take a few seconds. Once it completes, you're ready to push your old state to the new repo.
Step 6: Push State #
Grab the path to the state JSON file we downloaded earlier. Then, from the new_site terraform directory (same as pervious step) run...
tofu state push ~/tf-state.json # sub in your file pathThat's it. You should be able to navigate to your repo for new_site and see the state there. Assuming that worked, you can delete the state file from your local file system.
Step 7: Push & Build #
At this point, the only thing left to do is push your branch up with all the copied Terraform code and CI config. Follow your normal merge request flow, and you should be off to the races.*
*We all know that nothing having to do with CI goes 100% smoothly on the first try. Maybe today will be the exception for you.
- Previous: How I Made This Blog
- Next: The Secret of My "Success"